Best Practices for Using PEM Studs for Stainless Steel
Leading Self-Clinching Fasteners Manufacturer and Supplier in China
When working with PEM studs for stainless steel, proper installation is key to ensuring strong, reliable connections. This guide covers best practices to enhance performance, prevent failures, and optimize durability in your applications.
Table of Contents
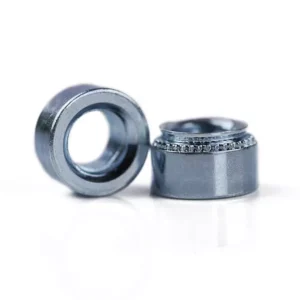
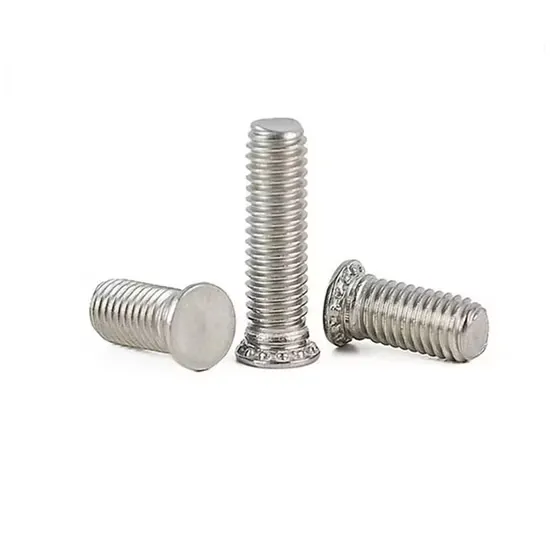
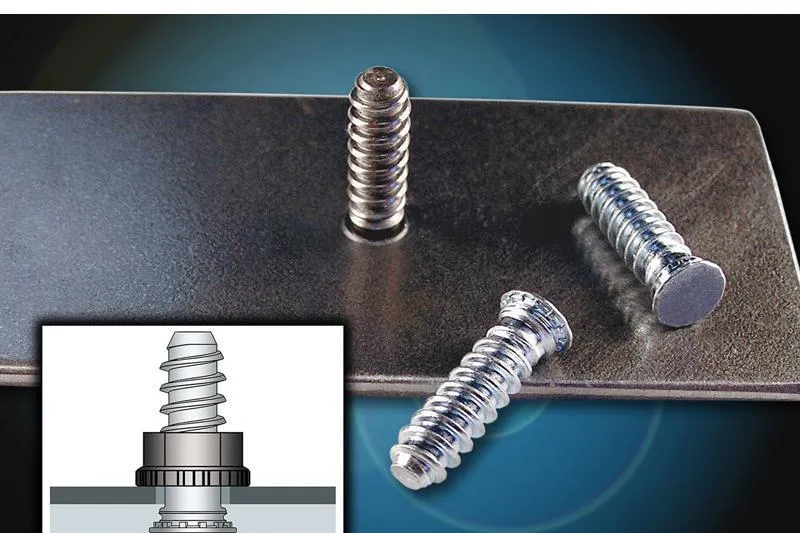
PEM Studs are self-clinching fasteners specifically designed for thin sheet materials such as stainless steel, aluminum, carbon steel, etc. They are installed into metal sheets through a cold-forming process, eliminating the need for welding or additional threading. PEM Studs create high-strength external threaded fastening points on the surface of the sheet material and are widely used in electronics, automotive manufacturing, medical equipment, and industrial enclosures.
How PEM Studs Work
- Pre-drilled Hole: A hole with a precise diameter matching the bottom of the stud is drilled into the sheet (size tolerance must be strictly controlled).
- Press-Fit Installation: Using a hydraulic press or a stamping machine, the stud is pressed into the sheet. The stud’s bottom features teeth or a flange that deforms the sheet plastically, filling the locking grooves of the stud.
- Mechanical Locking: The sheet and stud form a 360° circular lock, preventing the stud from rotating or coming loose, providing a reliable external threaded fastening point.
Why Choose PEM Studs for Stainless Steel?
1. Core Advantages: No Welding, No Threading, Saving Costs and Time
Using PEM® Self-Clinching Studs eliminates secondary processes such as welding and threading, offering several benefits:
No Heat Distortion:
High-temperature welding can damage the passivation layer of stainless steel, causing localized corrosion, while thermal distortion may lead to structural stress concentration. Unlike welded studs, PEM® studs use a cold-forming installation method, avoiding material warping or degradation of mechanical properties caused by high temperatures.
Reduced Processing Time:
No additional threading operations are required, improving production and assembly efficiency. Installation of a single stud takes only 2-3 seconds, making it ideal for automated production lines in large-scale operations.
Enhanced Connection Strength:
Stainless steel has high hardness (e.g., HRB 85-95 for 316 stainless steel), making drilling or threading more likely to wear down tools, increasing labor time and tool replacement frequency. The self-clinching mechanism provides a secure mechanical lock with the stainless steel sheet, offering a stable vibration-resistant fastening solution.
Aesthetic Clean Installation:
There are no burn marks or oxidation stains from welding, keeping the stainless steel surface clean. There are no welding fumes or cutting debris, aligning with green manufacturing trends.
2. Stainless Steel Compatibility: Corrosion Resistance and High Mechanical Strength
Material Strength Matching
- Standard Stainless Steels (304, 316): Suitable for applications requiring medium to high corrosion resistance, such as industrial enclosures or electronic housings.
- High-Strength Stainless Steels (17-4 PH, 410): These require higher pressure during installation but offer excellent tensile and shear strength, making them suitable for extreme conditions.
Corrosion Protection
- Passivated Stainless Steel PEM® Studs: Provide long-term oxidation and chemical corrosion resistance.
- Electropolished or Coated Studs: Provide additional protection against chlorides and corrosive substances, ideal for harsh environments.
Installation Compatibility
- Soft Stainless Steel (HRB ≤ 88): Can be installed directly with standard PEM® self-clinching studs.
- Hard Stainless Steel (HRB ≥ 90): Requires special high-strength fasteners (e.g., PEM® HFG8 or FH4 series), or the material should be pre-annealed to soften it for easier stud installation.
3. Typical Applications: Medical, Food Processing, and Marine Engineering
PEM® studs provide reliable fastening solutions in industries where cleanliness, corrosion resistance, and high mechanical strength are crucial.
Medical Equipment
- Suitable for stainless steel enclosures, instrument panels, and surgical devices, ensuring structural stability while meeting sterile design requirements.
- Self-clinching studs secure panel components without exposing fasteners, improving safety and convenience.
Food Processing and Packaging Machinery
- Stainless steel studs resist corrosion from moisture, food acids, and cleaning agents, ensuring long-term durability.
- They eliminate the risks of contamination or stress corrosion points associated with welding, meeting food-grade hygiene requirements.
Marine Engineering and Offshore Equipment
- Ideal for shipbuilding, offshore platforms, and coastal equipment, providing long-term performance in high salinity and humidity environments.
- Using 316 stainless steel PEM® studs effectively prevents galvanic corrosion in marine environments, providing superior durability when paired with marine-grade stainless steel.
Other High-Value Scenarios
- Semiconductor Equipment: Cleanroom environments require zero particle shedding; PEM’s debris-free installation avoids contamination.
- Rail Transportation: Lightweight stainless steel car bodies with high-strength fasteners meet EN 15085 welding alternative certification.
Do You Have Any Questions?
Let Us Solve Your Problem
How to Choose PEM Studs for Stainless Steel?
1. Material and Surface Treatment
Choosing the appropriate material and surface treatment is critical for the installation and long-term performance of PEM Studs. Common stainless steel materials such as 304 and 316 stainless steels offer excellent corrosion resistance and mechanical properties. However, their strength, hardness, and surface treatments differ from PEM® materials (such as Austenitic series).
Materials
304 Stainless Steel:
- Offers good corrosion resistance and high-temperature performance, widely used in the food processing, chemical industry, and more.
- Moderate strength, suitable for applications with lower load requirements.
- Easy to process but may experience corrosion in certain environments, especially in high salt or acidic conditions.
316 Stainless Steel:
- Has superior corrosion resistance, especially in seawater or other high-salinity environments.
- Slightly higher strength than 304, making it suitable for more demanding applications.
- Provides a longer service life in extreme environments, such as chemical plants or high-humidity conditions.
Surface Treatment
Passivation:
Passivating PEM® studs with nitric or citric acid removes free iron particles, improving resistance to rust and corrosion (compliant with ASTM A967 standards).
Special Coatings (Optional):
- PTFE Coating: Reduces the friction coefficient of threads, suitable for frequently removed access covers.
- Electropolishing: Used in medical equipment to achieve a smooth surface with Ra ≤ 0.4μm, inhibiting bacterial attachment.
2. Size and Load Capacity
The selection of PEM Studs should be based on the thickness of the connected stainless steel sheet, tensile requirements, shear strength, and other performance needs. Different plate thicknesses and structural loads will influence the design requirements for PEM Studs.
Plate Thickness Compatibility:
PEM Studs come in various sizes to accommodate different plate thicknesses.
- For thinner plates (e.g., 0.5-2mm), smaller studs can be used.
- For thicker plates (e.g., 6mm and above), larger diameter or custom PEM Studs are required to ensure stable fastening and clamping strength. Exceeding this may cause the stud neck to break or insufficient insertion depth.
Tensile/Shear Strength Requirements:
- When selecting PEM Studs, ensure that their tensile and shear strengths meet the connection requirements.
- The shear strength is typically 60-70% of the nominal value of the stud, based on the cross-sectional area of the cold-formed forging zone.
- Generally, PEM Studs offer a tensile strength of up to 12.8kN and a shear strength of up to 9.5kN. In some heavy-load applications, higher-strength PEM Studs may be necessary.
Load Capacity:
- High-strength stainless steel plates (such as 316 stainless steel) typically carry heavier loads, requiring PEM Studs that can withstand higher loads. For large load requirements, it is advisable to choose studs with reinforced threads or a higher-strength clinching design to improve overall stability.
- In vibration environments (e.g., rail transportation), a safety factor of 0.6-0.8 should be applied to the theoretical load values.
- In high-temperature environments (>150°C), a derating factor of around 15% should be applied to account for reduced strength.
3. Compatibility Check
Selection and Maintenance of Clinching Tools:
- Stainless steel’s high hardness can cause significant wear on clinching tools. When selecting clinching tools, ensure they are compatible with stainless steel materials and regularly check and maintain tool conditions to avoid tool damage that could lead to installation failure.
- Hardened tools are recommended to withstand the pressures of high-hardness materials.
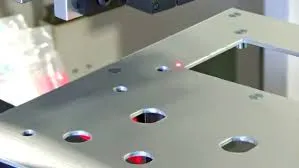
Hole Diameter and Wall Treatment:
- Stainless steel sheets have higher hardness compared to aluminum, requiring special attention to the precision of the hole diameter during drilling.
- A large hole tolerance may result in the PEM Studs failing to secure tightly, while a small hole tolerance may require excessive pressure during installation, causing local deformation of the stainless steel sheet.
- Proper treatment of the hole wall is also crucial; smooth hole walls reduce friction during clinching, improving installation stability.
PEM Studs Adaptability:
When selecting PEM Studs, consider the hardness of the stainless steel sheet and its compatibility with the PEM Studs. For higher-hardness stainless steel materials, choose PEM Studs with higher shear strength to ensure a stronger connection.
How to Install PEM Studs on Stainless Steel?
a. Pre-Treatment
Plate Flatness (Flatness ≤0.1mm/m²):
The flatness of the plate is crucial for the effectiveness of PEM Studs installation. Uneven surfaces can result in improper clinching, which impacts the connection strength. Ensure the surface is smooth without significant bumps or depressions to maintain stability and reliability during installation.
Deburring:
Burrs on punch edges (Burr Height ≤0.05mm) can scratch the surface coating of PEM® studs, causing micro-cracks and corrosion initiation.
- Mechanical Deburring: Use nylon brushes or magnetic polishing machines for large-scale production.
- Chemical Polishing: Immersion in a nitric-hydrofluoric acid mixture (for 316 stainless steel) to smooth edges (Ra ≤1.6μm).
Surface Cleaning:
The surface of the plate must be clean to avoid oil, dust, or oxidation that can affect the clinching process.
- Degreasing: Use an alkaline cleaning agent (pH 9-11) for ultrasonic cleaning for 5-10 minutes.
- Acid Activation: Soak in a 10% nitric acid solution for 30 seconds to remove the passivation film and enhance surface energy.
- Drying: Use compressed air to blow off the moisture, followed by drying in an 80°C oven for 20 minutes.
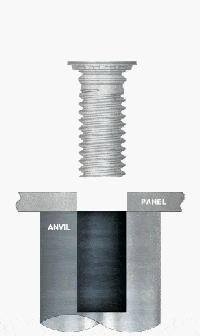
b. Clinching Parameters
Choosing the correct clinching parameters is essential to ensure the stable installation of PEM Studs. Incorrect parameters can lead to poor installation and reduced connection strength. For stainless steel, the following key parameters need special attention:
Equipment Pressure Values:
- The pressure of the clinching equipment must be adjusted based on the material and thickness of the plate. Stainless steel, being harder, requires higher pressure to ensure PEM Studs are fully embedded in the material. Typically, for stainless steel, it is recommended to use a hydraulic press with a pressure range of 2-4 tons. For thicker or harder plates, additional pressure may be needed.
- Avoid excessive pressure, as too much pressure may cause plate deformation or damage to the PEM Studs.
Form: Pressure Configuration
| Parameter | Stainless Steel (316) | Aluminum Alloy (6061-T6) |
| Unit Pressure | 8-10 kN/mm² | 3-5 kN/mm² |
| Stroke Control | Progressive pressure (80% pre-press, then 100% final press) | Uniform pressure applied in one go |
| Holding Time | 0.5-1 second (to avoid cold working crack formation) | 0.3 seconds |
Punch Speed:
- The speed of the punch is another crucial parameter. A too-fast punch speed could prevent the PEM Studs from being fully embedded or lead to cracks during the clinching process. It is recommended to control the punch speed between 2-5mm/s to ensure even pressure distribution, resulting in optimal installation.
- Compared to aluminum alloys, stainless steel requires slower punch speeds due to its higher hardness, ensuring complete installation of PEM Studs.
c. Quality Monitoring
Visual Inspection (Direct Assessment)
- Pass Criteria:
- A complete and even annular plastic deformation zone (width ≥ 0.4mm) at the bottom of the stud.
- No radiating cracks or wrinkles on the base material surface (use a 10x magnifier for assistance).
- Crack Detection:
- Apply red penetrant (e.g., Zyglo PT-7) and wipe off the excess. If any residual marks are left, it indicates the presence of cracks.
Dimensional Quantitative Inspection
- Cold Flow Zone Thickness:
- Measuring tool: Digital micrometer or optical profilometer.
- Standard: For an M4 stud, the base material deformation layer thickness should be between 0.25-0.35mm.
- Parallelism Tolerance:
- The alignment of the stud’s axis to the plate surface should be within 0.5° (measured using an angle gauge).
Functional Testing
- Torque Testing:
- Tool: Preset torque wrench (e.g., M4 test torque 4.5±0.5Nm).
- Criteria: After tightening/loosening three times, the torque decay should be ≤10%.
- Pull-Out Force Sampling:
- Equipment: Digital force gauge (accuracy ±1%).
- Standard: The measured tensile strength should be ≥80% of the nominal value (e.g., M4 stud pull-out value ≥3,200N).
Do You Have Any Questions?
Let Us Solve Your Problem
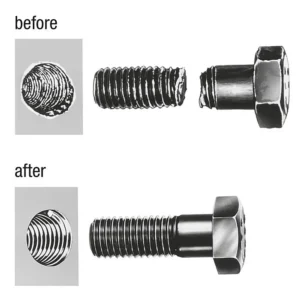
What Are the Common Mistakes When Using PEM Nuts on Stainless Steel?
1: Thread Deformation After Clinching
Problem Description: After installing PEM Studs, the threads become deformed or damaged, preventing proper use.
Causes:
- Excessive Punch Speed: If the punch speed is too fast, the impact force during the clinching process may be too great, leading to thread damage or deformation.
- Misalignment of Molds: If the molds are not aligned, PEM Studs may not receive even pressure during installation, affecting the integrity of the threads.
Solutions:
- Adjust Clinching Parameters:
- Reduce the punch speed to 8-10mm/s and increase the holding time to 0.8 seconds (for 316 stainless steel).
- Use a two-step clinching mode: 70% pre-press → 1-second pause → 100% final press, which helps to release stress concentration.
- Mold Calibration Process:
- Use a laser alignment tool to calibrate the coaxiality of the punch and base (tolerance ≤ ±0.05mm), checking before each workday.
- Replace tungsten carbide positioning pins (life is three times longer than tool steel).
- Thread Repair Solutions:
- Light Deformation: Manually fix with a thread repair tap (e.g., OSG STR type).
- Severe Deformation: Scrap the defective piece and reinstall (avoid re-clinching).
2: Joint Loosening
Problem Description: After installation, PEM Studs at the joint become loose and fail to provide sufficient connection strength.
Causes:
- Plate Thickness Out of Tolerance: If the plate thickness is outside the tolerance range, PEM Studs may not be embedded firmly or properly secured.
- Pre-drilled Hole Size Error: Incorrect hole size (either too large or too small) can affect the clamping effect of PEM Studs, leading to loose joints.
Solutions:
- Control Plate Thickness: Inspect plate thickness before installation to ensure it meets design specifications. Use online thickness gauges (accuracy ±0.01mm) to reject out-of-tolerance plates in real-time.
- Precisely Control Pre-drilled Hole Size: Ensure that the hole diameter and depth meet the specifications for PEM Studs. The hole tolerance should be controlled within ±0.05mm. Too large a hole will result in a loose installation, while too small a hole will prevent proper installation.
- Use Suitable Bushings or Repair Methods: If hole size is incorrect, consider using bushings or re-drilling to ensure a tight fit for the PEM Studs.
Corrosion Resistance Enhancement: Is Additional Sealant or Passivation Needed?
Problem Description: PEM Studs may face corrosion issues in some applications, especially in high-humidity or chemical environments. Should additional treatments be applied to enhance corrosion resistance?
Application Scenario Judgment
- Standard Environments (e.g., dry indoor conditions): PEM® all-stainless steel components (base material + stud) are sufficient to meet corrosion resistance requirements, no additional treatment is needed.
- Severe Corrosive Environments (e.g., marine salt spray, acidic/alkaline media): Additional measures are needed.
Enhanced Solutions Comparison
| Method | Operation Key Points | Advantages | Limitations |
| Passivation Treatment | Immerse studs in 20% nitric acid solution (50°C × 20 minutes) | Enhances passivation film density, low cost | Doesn’t fill micro-gaps, only delays corrosion |
| Sealant Coating | Apply sealant (e.g., Loctite 518 gasket sealant) to the base of the stud after clinching | Fills gaps, completely isolates from media | Increases process time, makes disassembly more difficult |
| Integrated Coating | Pre-nickel plating (5-8μm) or Dacromet coating | Salt spray resistance of 1000h+, uniform appearance | Increases cost by 30-50% |
Execution Recommendations
- Deep-sea Equipment/Chemical Reactors: Use passivation + sealant composite solution, passivate the stud and apply epoxy-modified silicone sealant (temperature resistance from -50°C to 200°C).
- Medical/Food Equipment: Only passivation treatment to avoid contamination risks from sealants.
- Cost-Sensitive Scenarios: Use plated studs (e.g., PEM® SG series nickel-plated studs) to reduce maintenance frequency.
Supplement: Quick Reference for Other Common Issues
| Issue | Quick Diagnosis | Emergency Measures |
| Stud Head Cracking | Excessive punch pressure or insufficient mold hardness | Reduce pressure by 10%, replace with tungsten carbide punch |
| Plate Deformation or Warping After Installation | Uneven local stress release (thick plates >3mm are prone) | Add multi-point support fixtures, use step-by-step clinching |
| Thread Locking (Difficult Disassembly) | Lack of lubrication or foreign object in threads | Apply PTFE release agent, slowly reverse torque to loosen |
How to Maintain and Store PEM Studs?
The long-term stability of PEM Studs depends on regular inspections and timely repairs. Especially in environments with vibration, impact, or high loads, a proper maintenance strategy can significantly extend their service life. Below are some recommendations for maintenance and long-term performance optimization.
Regular Inspection: Torque Attenuation Testing in Vibration Environments
In vibrating environments, PEM Studs may experience torque attenuation, affecting the strength and reliability of the connection. Regular inspections are essential for maintaining connection integrity. The following are common inspection and testing methods:
1. Vibration Testing:
- Purpose: Simulate real working conditions to assess whether PEM Studs loosen or fail under vibration.
- Testing Method: Use a vibration test system (e.g., equipment conforming to SAE J1455 standards) for periodic vibration testing to simulate operating conditions.
- Testing Conditions: Apply a frequency of 10Hz and amplitude of ±1.5mm, running for 50,000 to 200,000 cycles to evaluate whether PEM Studs exhibit loosening, deformation, or failure.
- Precautions: Ensure proper installation before testing, particularly regarding pressure and alignment accuracy, to prevent test deviations.
2. Torque Attenuation Testing:
- Purpose: Measure changes in connection strength over time, particularly in vibrating environments, to detect torque reduction.
- Testing Method: In a continuous vibration environment, periodically measure the torque value at the connection point and record the rate of attenuation.
- Recommended Frequency: Conduct inspections every three months or more frequently depending on operating conditions.
- Standard: Torque attenuation should not exceed 10% per year. If the reduction exceeds this threshold, replacement or maintenance is required.
Repair Strategies: Removal and Replacement Techniques for Damaged PEM Studs
If PEM Studs become damaged due to overuse, improper installation, or environmental factors (e.g., corrosion, overloading), timely repair or replacement is necessary. The following are effective repair strategies:
1. Removing Damaged PEM Studs:
- Removal Tools: Use specialized removal tools (such as extraction sleeves or reverse riveting machines) to safely remove damaged PEM Studs while avoiding additional damage to the base material.
- Removal Steps:
- Identify the damaged area: Perform a visual inspection or pull-out strength test to determine which PEM Studs need removal.
- Follow a sequential removal approach: Remove damaged PEM Studs from the outer areas inward.
- Use controlled force: Apply reverse force using a hydraulic press or dedicated extraction tool to gradually release installation pressure, avoiding sudden impacts.
2. Techniques for Replacing PEM Studs:
- Prepare replacement components: Ensure the replacement PEM Studs match the original in material and specifications to prevent compatibility issues.
- Replacement Steps:
- Clean the installation hole: Before replacement, clean the pre-installed hole surface and surrounding area to remove dirt, debris, or corrosion.
- Adjust tools and pressure: Set equipment pressure and installation dies according to the replacement PEM Stud’s specifications to ensure precise alignment.
- Install the new Studs: Follow standard installation procedures to press-fit the new PEM Studs, ensuring they are securely embedded and meet installation requirements.
- Testing and verification: After installation, conduct pull-out tests, torque tests, and vibration tests to confirm that the new PEM Studs are properly secured and meet performance standards.
3. Preventing Future Damage:
- Enhance preventive measures: Regularly inspect the equipment’s operating conditions, especially in high-load or high-vibration applications, and increase maintenance frequency to detect potential issues early.
- Design improvements: For applications that require frequent disassembly or endure extreme conditions, consider using removable PEM Studs, such as the PEM® S Series, which are specifically designed for repeated installation and removal.
Do You Have Any Questions?
Let Us Solve Your Problem
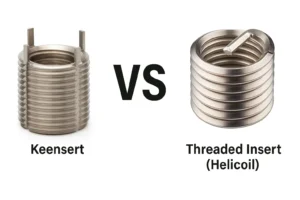
Why Do PEM Studs Stand Out in Fastening Solutions?
When selecting fastening solutions, it is crucial to consider the advantages and disadvantages of different technologies, especially in stainless steel applications. This comparison of welding, threaded inserts, and PEM® Studs under various working conditions helps businesses make more informed decisions.
1. Welding vs. PEM
Welding
- Advantages:
- Suitable for high-load, high-strength connections, providing a robust fastening effect.
- Can be used on components of various shapes and sizes, offering high flexibility.
- Disadvantages:
- Heat Deformation Risk: The high temperatures involved in welding can affect the base material, especially for aluminum and stainless steel, potentially leading to thermal cracks or deformation.
- High Costs: Welding requires heating equipment, skilled operators, and post-processing, increasing overall production costs.
- Low Production Efficiency: The welding process is complex, particularly in mass production, as each joint requires significant time compared to the quick installation of PEM® Studs.
PEM Studs
- Advantages:
- No Heat Deformation: Installed via a press-fit process, PEM® Studs do not require heat, eliminating material degradation due to thermal effects.
- Lower Production Costs: The quick installation process of PEM® Studs reduces time-related expenses compared to welding.
- Minimal Post-Processing: Unlike welding, PEM® Studs require no additional cleaning or coating after installation, simplifying the manufacturing workflow.
- Disadvantages:
- Less flexible for ultra-thick materials or uniquely shaped components compared to welding.
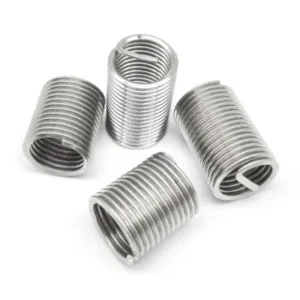
2. Threaded Inserts vs. PEM
Threaded Inserts
- Advantages:
- High Adjustability: Threaded inserts provide strong fastening force and flexibility, making them suitable for applications requiring frequent assembly and disassembly.
- Versatile Material Compatibility: They can be used in various materials, performing well in thin metal sheets.
- Disadvantages:
- Poor Long-Term Fatigue Strength: The connection between threaded inserts and the base material relies on friction, which may lead to fatigue failure over time, especially in high-vibration or impact environments.
- Complex Installation: Threaded inserts require pre-threading of the base material, adding extra processing steps and demanding high precision during installation.
- Lower Installation Efficiency: Each hole must be tapped, and issues such as thread stripping and loosening can arise, reducing overall efficiency.
PEM Studs
- Advantages:
- High Fatigue Strength: After press-fit installation, PEM® Studs form a stable bond with the base material, exhibiting superior fatigue resistance compared to threaded inserts, making them ideal for high-vibration applications.
- Quick Installation: Installed using hydraulic pressing, PEM® Studs are significantly faster and simpler to install than threaded inserts, greatly improving production efficiency.
- Disadvantages:
- Not ideal for applications requiring frequent disassembly.
Conclusion: Comprehensive Advantage of PEM
| Criteria | Welding | Threaded Inserts | PEM |
| Installation Speed | Low | Medium | High |
| Fatigue Strength | High (Fusion Bonding) | Low | Very High |
| Corrosion Resistance | Medium (HAZ Weakening) | Low | High |
| Overall Cost | High | Medium | Low |
With over 15 years of expertise in fastener manufacturing, Rivetfix has become a trusted global supplier. Our team of 200+ skilled workers and 40+ sales professionals ensures reliable service and consistent supply.
Partnering with Rivetfix means access to top-quality fasteners, cost-saving solutions, and custom designs. We focus on boosting your efficiency, enhancing product durability, and providing on-time delivery. Count on our expert support and continuous innovation for your fastening needs. Choose Rivetfix for premium PEM fasteners and more!
Get High Quality Rivet Nuts Quote!

Send Your Rivet Nut Request
For more than 20 years, Rivetfix has helped customers solve many rivet nuts sourcing needs and technical challenges.
Have a question? Contact us and we’ll provide you with the perfect solution.