How to Remove a Spinning Rivet Nut: Step-by-Step Guide
Leading Rivet Nut Manufacturer and Supplier in China
When a rivet nut begins to spin freely in its hole, removing it becomes a frustrating challenge—especially when conventional tools no longer work. If you’re struggling with how to remove a spinning rivet nut without damaging the base material, this guide is for you. In this article, we’ll walk you through practical, step-by-step methods tailored for different scenarios, from basic drilling to advanced cutting and extraction techniques, ensuring you can get back to a clean and reliable fastening point with confidence.
Table of Contents
Why Do Rivet Nuts Slip or Come Loose?

1. Oversized or Poorly Machined Installation Holes
Rivet nuts rely on a precise fit with the base material. If the pre-drilled hole is too large, or the hole lacks proper roundness or perpendicularity, the rivet nut cannot be tightly secured after expansion. Even if the installation appears complete, the actual holding force is weak, which can lead to spinning or complete detachment when torque is applied.
Solution: Follow the product manual or technical drawing closely. Use high-precision drills or stamping tools to ensure the hole diameter stays within the recommended tolerance, typically within ±0.05mm.
2. Material is Too Thin or Too Soft
Rivet nuts are designed for thin materials, but if the sheet is too thin or made of low-strength material (such as aluminum, plastic, or composites), it may not provide enough support during installation. The base material can deform, and the expansion section of the nut may fail to grip tightly, resulting in spinning.
Solutions:
- Use large flange rivet nuts to increase the contact area;
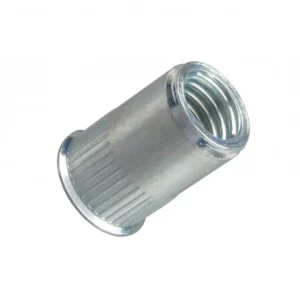
- Choose hexagonal or knurled body rivet nuts for enhanced anti-rotation performance;
- Consider alternatives like press-fit nuts or expansion-type fasteners (e.g., jack nuts) that are better suited for soft materials.
3. Inadequate Installation Tools or Torque
Proper installation of rivet nuts depends heavily on the tool used. Hand tools or low-powered pneumatic guns may fail to provide the required pulling force or stroke, resulting in incomplete expansion. Even if the nut appears secured, insufficient clamping force can cause loosening or spinning under load.
Recommendation: Use a dedicated rivet nut tool. Adjust the pulling force and stroke according to the nut specification. For critical applications, consider using torque-controlled or force-feedback equipment to ensure installation quality.
4. Incorrect Rivet Nut Selection (Structure or Material Mismatch)
Each application environment has different requirements. Using standard round-body rivet nuts in high-vibration or heavy-load scenarios may lead to loosening or failure due to stress concentration.
Better options include:
- Hexagonal or half-hex rivet nuts: Stronger anti-rotation performance;
- Knurled-body rivet nuts: Suitable for soft materials or high-torque applications;
- Stainless steel or alloy steel: Better strength and corrosion resistance;
- Proper surface treatments (zinc plating, Dacromet, etc.) to suit the environmental conditions.
5. Wear from Repeated Use After Installation
Rivet nuts are primarily designed for one-time permanent installations. Repeated tightening and loosening of bolts can wear down the grip area, especially in soft materials like aluminum, eventually leading to spinning or loosening.
Solutions:
- Avoid frequent disassembly; use permanent locking solutions;
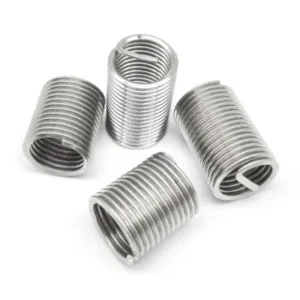
- For applications requiring repeated access, consider using replaceable thread inserts instead;
- Use locking bolts (e.g., nylon lock nuts) to enhance durability and prevent unintentional loosening.
6. No Anti-Loosening Measures in Vibrating or Impact Environments
In applications with continuous vibration—such as in automotive, construction equipment, or railways—standard rivet nuts may not remain secure over time. Vibration can cause metal fatigue and loss of clamping force, leading to failure.
Preventative measures include:
- Use bolts with anti-loosening features (spring washers, thread-locking adhesive, serrated washers);
- Choose rivet nuts with reinforced designs (e.g., thicker flanges, ribs);
- For maximum vibration resistance, consider alternatives like press-fit or welded nuts;
- Proper torque settings and periodic inspection of fastening points are essential for safety and long-term reliability.
How to Remove a Spinning Rivet Nut?
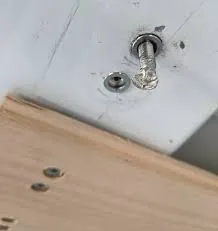
When a rivet nut starts spinning during use (i.e., it rotates within the base material and the bolt cannot be removed), conventional methods often fail. Specialized tools and techniques are required to deal with this issue. Below are several common removal methods. Choose the most suitable one based on the situation on site:
Method 1: Drill Out the Rivet Nut Core
Best for: When the bolt is still stuck in the center of the rivet nut and there’s enough space to work around it.
Steps:
- Use a tungsten steel drill bit (slightly larger than the bolt diameter);
- Drill directly into the center of the bolt to destroy the internal threads or break the bolt;
- Once the bolt is broken or the threads are damaged, pull out the bolt or enlarge the hole further to remove the rivet nut.
Tips:
- Always wear safety goggles to avoid flying metal chips;
- Drill at a moderate speed to prevent slipping or overheating.
Method 2: Use an Impact Driver or Manual Screwdriver to Break the Grip
Best for: When the rivet nut is only slightly spinning and still somewhat engaged.
Steps:
- Use an impact driver and tap the bolt head with a hammer while turning counterclockwise;
- This creates vibration that may break the bond between the bolt and the spinning rivet nut;
- If loosened, switch to a manual screwdriver to remove the bolt.
Tips:
- Suitable for light to moderate spinning;
- If it doesn’t work after a few tries, switch to another method.
Method 3: Cut the Flange or Exposed Portion Using a Dremel Tool
Best for: When the flange of the rivet nut is exposed on the surface of the base material.
Steps:
- Use a Dremel or rotary cutting tool to cut through the exposed portion of the rivet nut;
- You can cut across the flange (horizontal) or along the body (vertical), then use pliers to remove it.
Tips:
- Be cautious of high temperatures and flying debris — take fire safety and eye protection measures;
- Not suitable if the flange is flush with the surface or countersunk.
Method 4: Clamp the Flange with Pliers and Unscrew the Bolt
Best for: When the rivet nut is spinning but not fully free, or if the flange can still be clamped.
Steps:
- Use large needle-nose or locking pliers to firmly grip the flange edge;
- While holding the rivet nut in place, turn the bolt counterclockwise to remove it;
- Once the bolt is out, the rivet nut can be pushed or broken out.
Tips:
- Best done with two people: one to hold, one to unscrew;
- If the flange gets damaged or slips, switch to another method.
Method 5: Use an Allen Key If the Nut Has Internal Features
Best for: Some rivet nuts have internal hex or star-shaped profiles that allow tool engagement.
Steps:
- Insert a correctly sized Allen key (e.g., H4, H5, etc.) into the nut;
- Rotate while pulling outward, attempting to remove the rivet nut entirely;
- If it fails to rotate the nut, use cutting or clamping tools to assist.
Tips:
- Not all rivet nuts have this feature — check before attempting;
- Make sure the tool fits precisely to avoid further stripping.
Do You Have Any Questions?
Let Us Solve Your Problem
How to Replace the Rivet Nut?
If the rivet nut is still tightly fixed to the base material, special tools will be needed to remove it. Common removal methods include:
- Drilling: Use a metal drill bit to drill through the center, destroying the internal threads or the locking structure;
- Cutting: Use a Dremel rotary tool or angle grinder to cut off the flange of the rivet nut;
- Pliers Removal: If the flange is accessible, clamp it with pliers while unscrewing the bolt or the nut body;
- Impact Tool Assistance: Use an impact driver to loosen the bolt, which may help disengage the rivet nut.
Make sure not to damage the base material, especially the edges of the installation hole—these should remain as intact as possible.
Step 2: Inspect and Repair the Original Hole
After removing the rivet nut, inspect the condition of the mounting hole:
- If the hole has expanded or deformed, use a file to smooth it or weld and re-drill it;
- If there are burrs or rust, sand the hole clean to ensure proper contact with the new nut;
- Use a vernier caliper to re-measure the hole diameter to ensure it matches the new rivet nut.
The quality of the hole directly affects the locking performance. After preparing the hole, it’s recommended to perform a trial fitting before final installation.
Step 3: Select a Replacement Rivet Nut
Choose a new rivet nut based on the original design or specific application needs:
- Material: Common options include stainless steel (corrosion-resistant), carbon steel (high strength), and aluminum (lightweight);
- Shape and Structure: Round, hex, half-hex, open-end, closed-end, etc.;
- Surface Finish: Zinc plating, nickel plating, black oxide, Dacromet, etc., depending on the working environment;
- Anti-Rotation Features: If the original nut failed due to spinning, choose a nut with anti-rotation design, such as a knurled or hex-shaped rivet nut.
- Prepare the Tool: Use a manual or pneumatic rivet nut gun (ensure the mandrel matches the nut size);
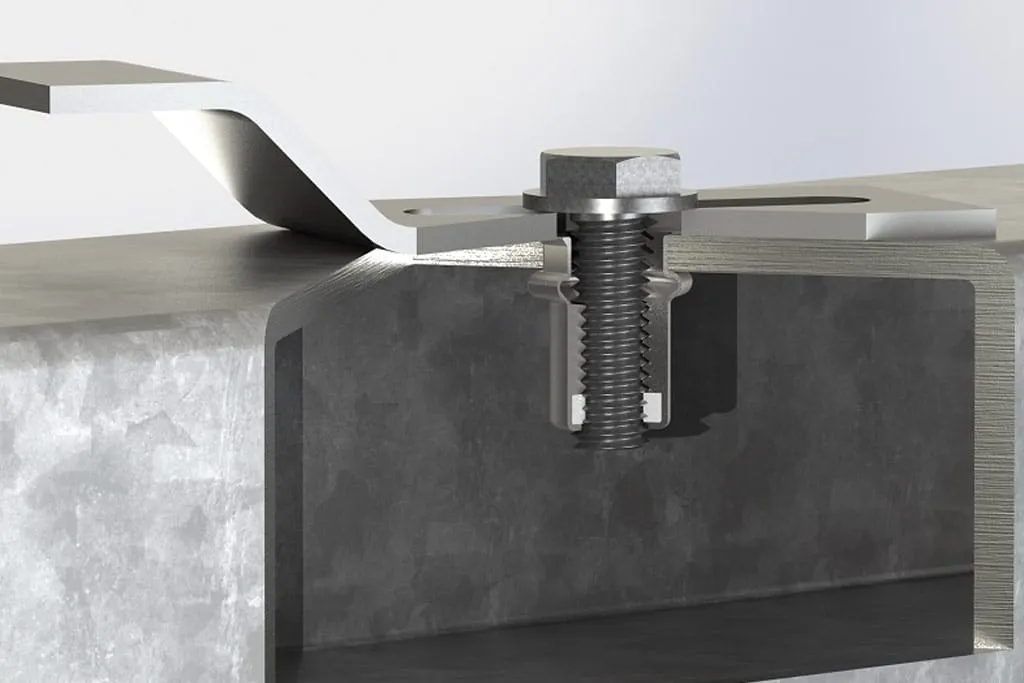
- Align with the Hole: Insert the rivet nut vertically—avoid tilting;
- Perform the Installation: Operate the tool to compress and deform the back side of the rivet nut to form a secure lock;
- Check the Result: Ensure the rivet nut is tight, flush, and does not rotate.
After installation, use a bolt to test the threads and check that the rivet nut is firmly anchored.
Step 5: Protective Treatment (Optional)
For outdoor or corrosive environments, consider the following:
- Apply anti-rust oil around the threads or rivet nut;
- Use sealing washers or waterproof screws to improve sealing performance;
- Apply paint or protective coatings to enhance both aesthetics and environmental resistance.
How to Prevent Rivet Nuts from Spinning in the Future

Once a rivet nut starts spinning, it can lead to structural looseness, rework, or even safety hazards. To prevent recurrence, it’s essential to consider factors such as nut selection, installation process, base material design, and service environment. Below are practical prevention strategies:
1. Choose Rivet Nuts with Anti-Rotation Features
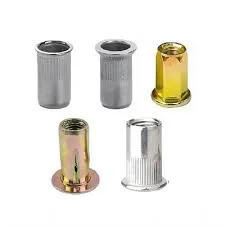
Rivet nuts come in various structural designs, each offering different levels of anti-rotation performance:
- Hexagonal Rivet Nuts: Inserted into hex-shaped holes, offering excellent resistance to spinning;
- Half-Hex Rivet Nuts: Suitable for semi-punched holes, balancing anti-rotation with ease of installation;
- Knurled or Serrated Flange Types: Fine teeth on the flange bite into the base material to resist rotation;
- Slotted Expansion Types: Expand radially during installation, embedding into the material for a stronger grip.
Selecting the appropriate structure based on hole shape and load requirements is the first step to preventing spin-out.
2. Ensure Hole Accuracy and Proper Fit
The holding strength of a rivet nut largely depends on the quality and compatibility of the installation hole:
- Oversized Holes: Insufficient deformation during installation results in a loose fit;
- Excessive Burrs: Prevent full seating of the rivet nut against the material;
- Misaligned or Deformed Holes: Cause tilted installation, leading to uneven stress and higher risk of spinning;
- Recommended Tolerance: Keep hole diameter tolerance within ±0.1 mm, especially for high-load applications.
For hex rivet nuts, use precision-stamped or laser-cut hexagonal holes to ensure secure engagement.
3. Apply Proper Installation Technique and Tool Pressure
Incorrect installation is a major cause of rivet nut spinning:
- Insufficient Pulling Force: Fails to properly expand the nut behind the panel, resulting in a loose fit;
- Misaligned Installation Angle: Leads to uneven expansion and weak locking;
- Over-tightening: Can damage the base material or crack the nut body;
- Recommendation: Use professional rivet nut tools, and set proper torque or stroke based on the nut type.
Electric-hydraulic or pneumatic tools help improve consistency and reduce manual errors.
4. Increase Base Material Strength or Thickness
Thin or soft materials (e.g., aluminum, copper) are more prone to rivet nut rotation. Consider the following:
- Add Reinforcement Ribs: Create thicker areas or use overlapping plates around the installation zone;
- Use Stronger Materials: Replace soft metals with cold-rolled steel or stainless steel;
- Add Support Washers: Strengthen the area around the hole;
- Widen the Flange Contact Area: Increases friction and surface engagement.
This is especially important in high-load or high-vibration applications.
5. Use Thread Locking and Anti-Loosening Techniques
Even if the rivet nut is well secured, frequent bolt movement can eventually loosen the nut. To prevent this:
- Use nylon insert lock nuts or thread-locking adhesives (e.g., Loctite);
- Install spring washers or wave washers to improve resistance to loosening;
- Periodically check torque values on critical fasteners to detect fatigue-induced loosening early.
6. Schedule Regular Maintenance and Condition Checks
For long-term equipment or structural applications, routine inspection is essential:
- Check for signs of rivet nut loosening, spinning, cracking, or corrosion;
- Monitor environmental conditions such as humidity, corrosive elements, and galvanic reactions;
- Replace slightly loosened nuts immediately to prevent further damage or failure.
1. Under What Conditions Do Rivet Nuts Tend to Spin or Slip?
Rivet nuts are prone to spinning or slipping under the following conditions:
- Oversized or irregular holes result in insufficient locking after installation;
- Rivet nuts without anti-rotation features (e.g., smooth round bodies without knurling or teeth);
- Thin or soft base materials like aluminum or copper with low load-bearing strength;
- Inadequate pulling force during installation causes incomplete expansion;
- Repeated screwing and unscrewing of bolts wears out the contact surfaces over time.
2. Will the Base Material Be Damaged During Removal?
If proper tools and methods are used, removing rivet nuts usually won’t cause significant damage to the base material:
- For metal sheet structures, use an electric drill to remove the core, then extract with pliers to minimize damage;
- For softer materials (e.g., aluminum), use low-speed drilling with a center guide to avoid hole deformation;
- To protect the area around the hole, you can cover it with masking tape or use a depth-limiting drill bit.
3. Can a New Rivet Nut Be Reinstalled in the Original Hole?
Whether reinstalling is feasible depends on the condition of the original hole and the design of the new rivet nut:
- If the hole remains within tolerance, you can reinstall the same specification of rivet nut directly;
- If the hole is enlarged or deformed, consider using a rivet nut with a larger outer diameter or upgrading to a hex-type or anti-rotation design;
- For severely damaged holes, repair options include:
- Welding and re-drilling;
- Reinforcing with sleeves or washers;
- Switching to an alternative fastening method (e.g., welded nuts or studs).
4. Are There Specialized Designs to Prevent Rivet Nut Spinning?
Yes, to prevent rivet nuts from spinning or loosening during use, you can choose from the following designs:
- Hexagonal rivet nuts: Installed in hex holes, providing the strongest anti-rotation performance;
- Serrated flange rivet nuts: Create a mechanical grip with the base material to improve anti-rotation;
- Double-deformation rivet nuts: Provide more contact area and greater expansion force;
- Sealed types with rubber rings: Offer waterproofing and vibration resistance, ideal for outdoor use.
5. How Can I Remove a Rivet Nut Without Damaging the Base Material?
To remove a rivet nut without damaging the base material, try the following methods:
- Use an Allen key or impact screwdriver to unscrew the bolt and reverse-pull the rivet nut (works if the nut hasn’t fully spun);
- If the rivet nut has a flange, use thin flat-nose pliers to twist and pry it out from underneath;
- Use a Dremel rotary tool to cut a partial circle along the flange edge, then remove with pliers;
- For soft substrates, you may also gently tap it out from the back side.
Do You Have Any Questions?
Let Us Solve Your Problem
Buy Rivet Nuts from Rivetfix

As a leading fastener manufacturer in China with more than 15 years in the industry, Rivetfix are committed to providing first-class quality fasteners and responsive services to the world.
Rivetfix offers a wide range of rivet nuts and rivet nut tools designed to meet the unique demands of your projects. Rivetfix ensures you have the right solution for every application. Choose Rivetfix for versatile, cost-effective, and durable fastening solutions tailored to your specific needs. In addition, we can also provide customized rivet nuts service according to your requirements.
Contact us for project advice and the latest rivet nuts and rivet nut tools quote!
Get High Quality Rivet Nuts Quote!

Send Your Rivet Nut Request
For more than 20 years, Rivetfix has helped customers solve many rivet nuts sourcing needs and technical challenges.
Have a question? Contact us and we’ll provide you with the perfect solution.