How to Remove Rivet Nuts?
Leading Rivet Nut Manufacturer and Supplier in China
Rivet nuts are widely used to create strong, secure threaded connections, but there are times when you may need to remove them. Whether it’s for replacing damaged rivet nuts or making adjustments during a project, knowing how to remove rivet nuts effectively is crucial. In this blog, we’ll explore the different methods of removing rivet nuts safely and efficiently, ensuring you don’t damage the surrounding material. Let’s dive into how to remove rivet nut.
Table of Contents
Why do Rivet Nuts Come Loose?

1. Improper Installation Torque
If the rivet nut is not tightened to the correct torque, it can fail to securely grip the material.
- Insufficient Torque: When the rivet nut is not tightened enough, it won’t expand fully in the material, preventing a strong grip. This can cause the nut to slip or work loose over time, especially under stress or vibration.
- Excessive Torque: On the other hand, over-tightening the rivet nut can damage the threads, distort the nut’s shape, or deform the surrounding material. This may weaken the connection and lead to the rivet nut failing to hold its position properly.
2. Incorrect Rivet Nut Size
Incorrect Rivet Nut Size occurs when the rivet nut does not match the required dimensions for the material or application. This can lead to several issues:
- Too Large: If the rivet nut is too large for the hole, it may not expand correctly, leading to poor load distribution or a weak connection. It may also fail to grip the material properly, causing the nut to become loose over time.
- Too Small: If the rivet nut is too small for the hole or the material’s thickness, it won’t provide enough holding strength. This can result in the nut pulling out under stress or the material cracking due to insufficient support.
3. Material Weakness
Material Weakness can cause rivet nuts to loosen or fail, especially if the base material is not strong enough to support the load or stress applied to the rivet nut.
- Soft Materials: If the base material is too soft (e.g., certain plastics or low-grade metals), the rivet nut may not create a firm, long-lasting hold. Over time, the material can compress, crack, or strip, causing the rivet nut to lose its grip.
- Thin Materials: For thin or fragile materials (e.g., sheet metal, thin plastics), the rivet nut may cause deformation during installation or use. This weakens the connection, leading to loosening or failure, especially under high stress or repeated use.
- Corrosion or Wear: Over time, materials exposed to environmental factors like moisture or chemicals can degrade, compromising the strength of the rivet nut connection. Corrosion can cause materials to become brittle or prone to breaking under stress.
Jack nuts are ideal for soft materials like plastics, thin metals, and composites, as they provide a strong threaded connection without damaging the material. These fasteners expand when installed, creating a secure hold that prevents material deformation or cracking.
For softer materials, jack nuts help distribute the load evenly, ensuring a durable connection even in demanding applications. They are easy to install and can be used in various industries, including automotive, electronics, and furniture.
4. Vibration or Dynamic Loads
Continuous vibration or exposure to dynamic forces can weaken the rivet nut’s grip.
Vibration or Dynamic Loads can cause rivet nuts to loosen over time, especially in applications where the fastener is subjected to constant or fluctuating forces.
Vibration: In environments where equipment or parts experience frequent vibrations (e.g., automotive or aerospace), the repeated movement can gradually loosen the rivet nut. This is because the nut may not be able to withstand the constant shifting and stress without proper locking mechanisms.
Dynamic Loads: Dynamic loads refer to forces that change in magnitude or direction over time, such as machinery that starts and stops frequently. These varying loads can put extra stress on the rivet nut, increasing the likelihood of it loosening.
If the rivet nut’s grip range does not match the material thickness correctly, the nut may not expand properly, resulting in a loose connection.
- Too Large a Grip Range: If the rivet nut is designed for a thicker material but is used on a thinner one, it may not expand properly or evenly. This can result in a weak connection, where the rivet nut fails to hold firmly in place, leading to potential loosening or detachment.
- Too Small a Grip Range: On the other hand, if the grip range is too small for the material thickness, the rivet nut may not properly engage or secure itself within the hole. This can cause the nut to slip, rotate, or even pull out, leading to failure of the fastened connection.
How to Remove Rivet Nuts?
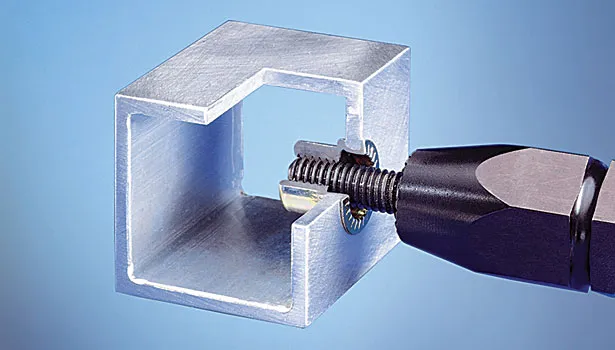
1. Using a Rivet Nut Removal Tool
- Tool: A rivet nut removal tool (also called a rivet nut extractor) is designed specifically for extracting rivet nuts.
- Steps:
- Insert the tool into the rivet nut.
- Turn the tool in the opposite direction (counterclockwise) to loosen the rivet nut.
- Continue turning until the rivet nut is completely removed from the material.
- Advantages: Quick and efficient, especially for high volumes or when removing multiple rivet nuts.
2. Drilling Out the Rivet Nut
- Tool: A drill and metal bit (typically a larger size than the rivet nut’s outer diameter).
- Steps:
- Choose a drill bit slightly larger than the outer diameter of the rivet nut.
- Drill into the center of the rivet nut to remove it.
- If needed, use a punch or hammer to break off the remaining nut body from the hole.
- Advantages: Effective when the rivet nut is stuck or can’t be removed using other methods.
- Disadvantages: This method may damage the material, so it’s suitable for cases where the material can be repaired or replaced.
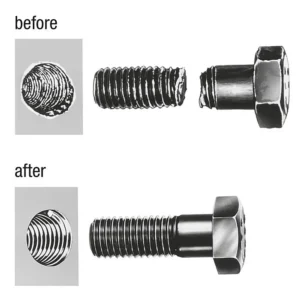
3. Using a Bolt or Screw
- Tool: A bolt or screw and a wrench.
- Steps:
- Insert a bolt or screw into the rivet nut.
- Tighten the bolt to the point where the rivet nut starts to collapse or loosen from the material.
- Once loose, you can pull out the rivet nut by hand.
- Advantages: Simple and useful for removing smaller rivet nuts.
- Disadvantages: May not work well for rivet nuts that are particularly tight or rusted.
4. Cutting the Rivet Nut (if necessary)
- Tool: A hacksaw or angle grinder.
- Steps:
- Use a hacksaw or angle grinder to carefully cut through the body of the rivet nut.
- After cutting, use pliers to remove any remaining pieces.
- Advantages: Effective for stubborn rivet nuts.
- Disadvantages: This method can cause significant damage to the surrounding material and should be used as a last resort.
Key Tips for Successful Rivet Nut Removal:
- Always wear safety equipment (gloves, goggles, etc.) to prevent injury, especially when using power tools or cutting.
- For delicate materials, try to avoid aggressive methods that could cause damage.
- If possible, test removal methods on scrap material first to prevent damage to the primary workpiece.
Do You Have Any Questions?
Let Us Solve Your Problem
How to Replace Rivet Nuts?
Replacing rivet nuts involves removing the existing rivet nut and installing a new one to restore the functionality of the connection.
1. Remove the Old Rivet Nut
- Tools Needed: Rivet nut removal tool, drill, or cutting tool (depending on the rivet nut condition).
- Steps:
- Use a Rivet Nut Removal Tool: If the rivet nut is in good condition but needs to be replaced, use a rivet nut removal tool to unscrew it in the reverse direction.
- Drill Out the Rivet Nut: If the rivet nut is damaged or stuck, drill it out with a bit slightly larger than the rivet nut’s outer diameter.
- Use a Bolt to Loosen: In some cases, you can insert a bolt into the rivet nut and tighten it to force the nut loose.
- Cut the Rivet Nut (if necessary): For stubborn or rusted rivet nuts, use a hacksaw or angle grinder to cut through the nut.
2. Clean the Hole
- Tools Needed: Cleaning tool (e.g., a wire brush or compressed air), file.
- Steps:
- After removing the old rivet nut, ensure that the hole is free from debris, rust, or old rivet nut pieces.
- Clean and deburr the edges of the hole using a file or a wire brush to ensure smooth installation of the new rivet nut.
3. Select the Correct Rivet Nut
Factors to Consider:
When selecting a rivet nut for your application, several factors need to be considered to ensure it will function correctly and last over time.

Size
- Hole Diameter: The rivet nut should fit the hole diameter in the material. The outer diameter of the rivet nut should match the hole size to ensure a secure installation.
- Grip Range: The grip range defines the thickness of the material the rivet nut can securely fasten. Ensure the grip range accommodates the material’s thickness, whether thin or thick, for a tight, durable connection.
- Thread Size: The internal thread size of the rivet nut must match the bolt or screw that you intend to use. The most common thread sizes are M5, M6, M8, M10, etc. Choose one based on the application requirements.
Material
- Strength and Durability: Choose a material that aligns with the strength requirements of your application.
- Compatibility: Ensure the rivet nut material is compatible with the material it’s being installed into, particularly to prevent galvanic corrosion (e.g., steel nuts in aluminum materials).
| Material | Best For | Key Features |
| Steel | Heavy-duty applications requiring high strength | High strength, wear resistance, corrosion resistance |
| Aluminum | Lightweight applications | Lightweight, corrosion resistance, easy installation |
| Stainless Steel | Outdoor or corrosive environments | Strength, excellent corrosion resistance |
| Brass | Electrical applications | Good electrical conductivity, corrosion resistance |
- Tools Needed: Rivet nut installation tool (manual or pneumatic).
- Steps:
- Insert the New Rivet Nut: Place the new rivet nut into the hole, ensuring it fits snugly.
- Use the Rivet Nut Tool: Using the appropriate tool, squeeze or pull the rivet nut into the material. This will cause the rivet nut to expand and secure itself firmly in place.
- Verify Proper Expansion: Check that the rivet nut is fully expanded and seated securely within the material.
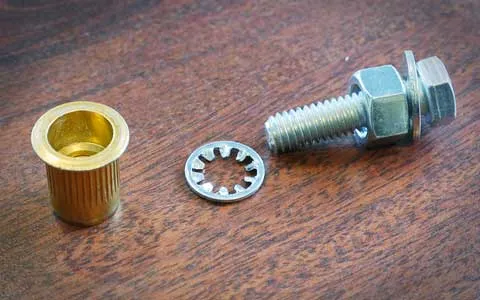
5. Test the Connection
- Tools Needed: Bolt or screw, wrench.
- Steps:
- After installing the new rivet nut, insert a bolt or screw into the threaded hole and tighten it to ensure a secure, reliable connection.
- Verify that the new rivet nut can hold the required load and torque without slipping or loosening.
Are Rivet Nuts Permanent?

Yes, rivet nuts are designed to create permanent, secure threaded connections in materials.
Once installed, they form a durable connection that cannot be easily removed or loosened without specialized tools. The expansion of the rivet nut inside the material creates a lasting bond, making it ideal for applications where a reliable, long-term fastening solution is needed.
However, if removal or replacement is required, the process may involve drilling or cutting out the rivet nut. It should be noted that this process may damage the surrounding material.
Do You Have Any Questions?
Let Us Solve Your Problem
Rivetfix- Ready to Provide You With Rivet Nut Selection Advice and Solutions

Rivetfix is here to offer expert advice and tailored solutions for all your rivet nut needs. Whether you’re unsure about the right size, material, or installation process, our team is ready to guide you through every step of the selection process.
With a wide range of high-quality rivet nuts and deep industry knowledge, Rivetfix ensures you make the best choice for your application. We’re committed to providing reliable, durable, and cost-effective fasteners to meet the demands of your project. Let us help you make your fastening solutions easy and efficient.
Contact us for project advice and the latest rivet nut quote!
Get High Quality Rivet Nuts Quote!

Send Your Rivet Nut Request
For more than 20 years, Rivetfix has helped customers solve many rivet nuts sourcing needs and technical challenges.
Have a question? Contact us and we’ll provide you with the perfect solution.